How To Enable And Use Wake on LAN On Windows 10
Convenience is a key factor that people look for when it comes to their computer setup. Fortunately, as technology evolves, companies are creating features that make it easier to have full control over the devices that you own. Wake on LAN, sometimes simply referred to as WOL, is one feature that can add a smart function to your computer.

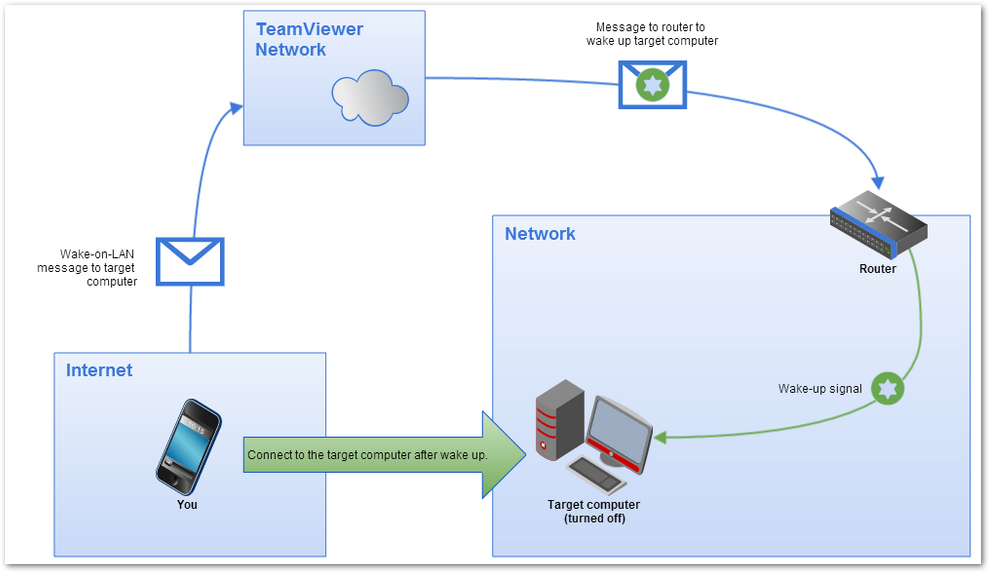
This feature allows you to start your computer remotely easily, but you need to understand how it works fully. In this article, we will look at how to enable the Wake on LAN feature and take advantage of it within your local network.
What Is Wake On LAN?
Wake on LAN is a specific function that allows a computer to be powered on or woken up from sleep mode via remote methods. There are different strategies that you can use, but they all essentially give you a “remote” power button that you can use.
It is important to note that Wake on LAN does not work with a wireless connection but rather demands that the computer is connected to a network with an ethernet cable. There are several reasons why you might want to take advantage of Wake on LAN. For example, when you need to remotely access files on your computer, then the WOL feature can help to power up your computer without being in the same room. You can then use certain apps to gain remote access to files on your computer.
How To Determine Compatibility In Your Computer
Before you attempt to enable Wake on LAN, you first need to consider whether your computer is actually compatible with the feature. Your computer needs a special type of ethernet port in order to use the function. Thus, not every computer or laptop will offer you the ability to use a Wake on LAN function.
The easiest way to determine if your computer supports this function is to enter its BIOS settings. The method to enter your bios depends on the computer you have and, in particular, the motherboard fitted inside. Turn your computer off and then on again. As soon as the BIOS loading screen shows, you should press a key in order to enter the BIOS setup page. This key is usually F1, Delete, or Esc, but some BIOS firmware uses other keys.
Once you are on the BIOS settings page, navigate to the “Power” tab and look for a “WOL” or “Wake on LAN” feature. If you see this feature listed on the BIOS page, then your computer supports the function. Sometimes, the feature is located in a different tab, such as “Advanced Settings.”
Enable Wake On LAN Feature
Now that you know your computer supports Wake on LAN, the next step is to actually enable it. There are two steps that you need to take in order to enable the feature. If you fail to follow them accordingly, then the feature may not work properly.
The first step is to head to the Device Manager in Windows 10. You can right-click on the start button, then choose Device Manager in the menu that pops up. Expand the “Network Adapters” section and find the network card installed in your computer in the list that shows up. Make sure you have the correct drivers installed for the card. Right-click on its listing and choose “Properties.”
Navigate to the “Advanced” tab, then take a look at the list of entries in the “Property” section. You need to find the Wake on LAN feature here, but the specific name can vary. Try to look for any of the following entries in the list:
- Wake on LAN
- Wake on magic packet
- Remote wake-up
- Power on by LAN
- Resume on LAN
- Power up by LAN
Once you find it, click on the entry, then choose “Enabled” in the value box on the right side of the window. Head to the “Power Management” tab next. Here, you should see a couple of checkboxes. Check the ones that read “Allow this device to wake the computer”, as well as the “Only allow a magic packet to wake the computer” entries. Click on “OK”, then you are ready to proceed with the next step.
To properly use Wake on LAN, you also need to enable it in your BIOS settings. We shared details about how to check if your computer supports the feature in a previous section. Follow the instructions that we provided in order to enter your computer’s BIOS settings again. Once you get to the “Power” section in your BIOS settings, head over to the Wake on LAN entry. You should switch the status from Disabled to Enabled.
Make sure you save the new settings before you restart your computer. If you followed both of these steps, then your computer should now allow you to send a magic packet to it and then power it on by itself.
What To Do When Wake On Lan Does Not Work?
Sometimes, you follow the steps exactly as we discussed, but you end up with a Wake on LAN function that does not seem to function. In this case, you need to troubleshoot the situation in order to find out why it is not working.
In most cases, the problem lies with the power settings that you have configured in Windows 10. This version of Windows uses a new feature called “Fast Startup”. When you shut down your computer, Windows uses a special technique to ensure the next startup is faster. The function only works with shutdown and not when you restart your computer. However, if this particular setting is turned on, it may affect your ability to remotely start your device.
Open up the Control Panel on your computer. Once again, right-click on the Windows menu icon and choose “Control Panel”, or click on the start button and type “Control Panel”. Note that this feature is not something you can adjust in the default Windows 10 Settings app. You will need to adjust it in the classic Control Panel.
Once you have the Control Panel open, head to “System and Security”, then choose “Power Options”. Now, navigate to the link that reads, “Choose what the power buttons do”. On this page, you will notice settings related to the behaviour of your computer based on specific power buttons that you can press.
If you look at the page’s bottom region, there will be a section called “Shutdown Settings”. This is where you can find the Fast Startup setting, which is greyed out by default. To disable Fast Startup, you need to click on the “Change settings that are currently unavailable” link at the top of the page. An administrator prompt will pop up, which you need to agree to.
Conclusion
Wake on LAN is a convenient function that allows you to power up a computer remotely easily. You might want to use this function in several scenarios, but you first need to determine if your computer has the built-in feature. Taking advantage of WOL is not hard, but you should follow the steps we shared in this post. Take note that some changes to the feature are made between various versions of Windows.
References
- https://www.windowscentral.com/how-enable-and-use-wake-lan-wol-windows-10
- https://www.lifewire.com/how-to-enter-bios-2624481
Written by The Original PC Doctor on 2/1/2023.